
TL;DR
In small closet booths, placement and sealing are more effective than just adding foam. Proper mic positioning, reflection management, and ventilation make the biggest difference in sound quality and heat control.
Ever tried to soundproof a tiny closet and ended up with a boxy, echoey mess? You’re not alone. Many assume more foam equals better sound, but the real secret is smart placement and sealing.
If you want your voice to shine without a wall of foam or a roaring fan, this guide shows how to turn your closet into a quiet, clear, and cool studio — without breaking the bank or your back.
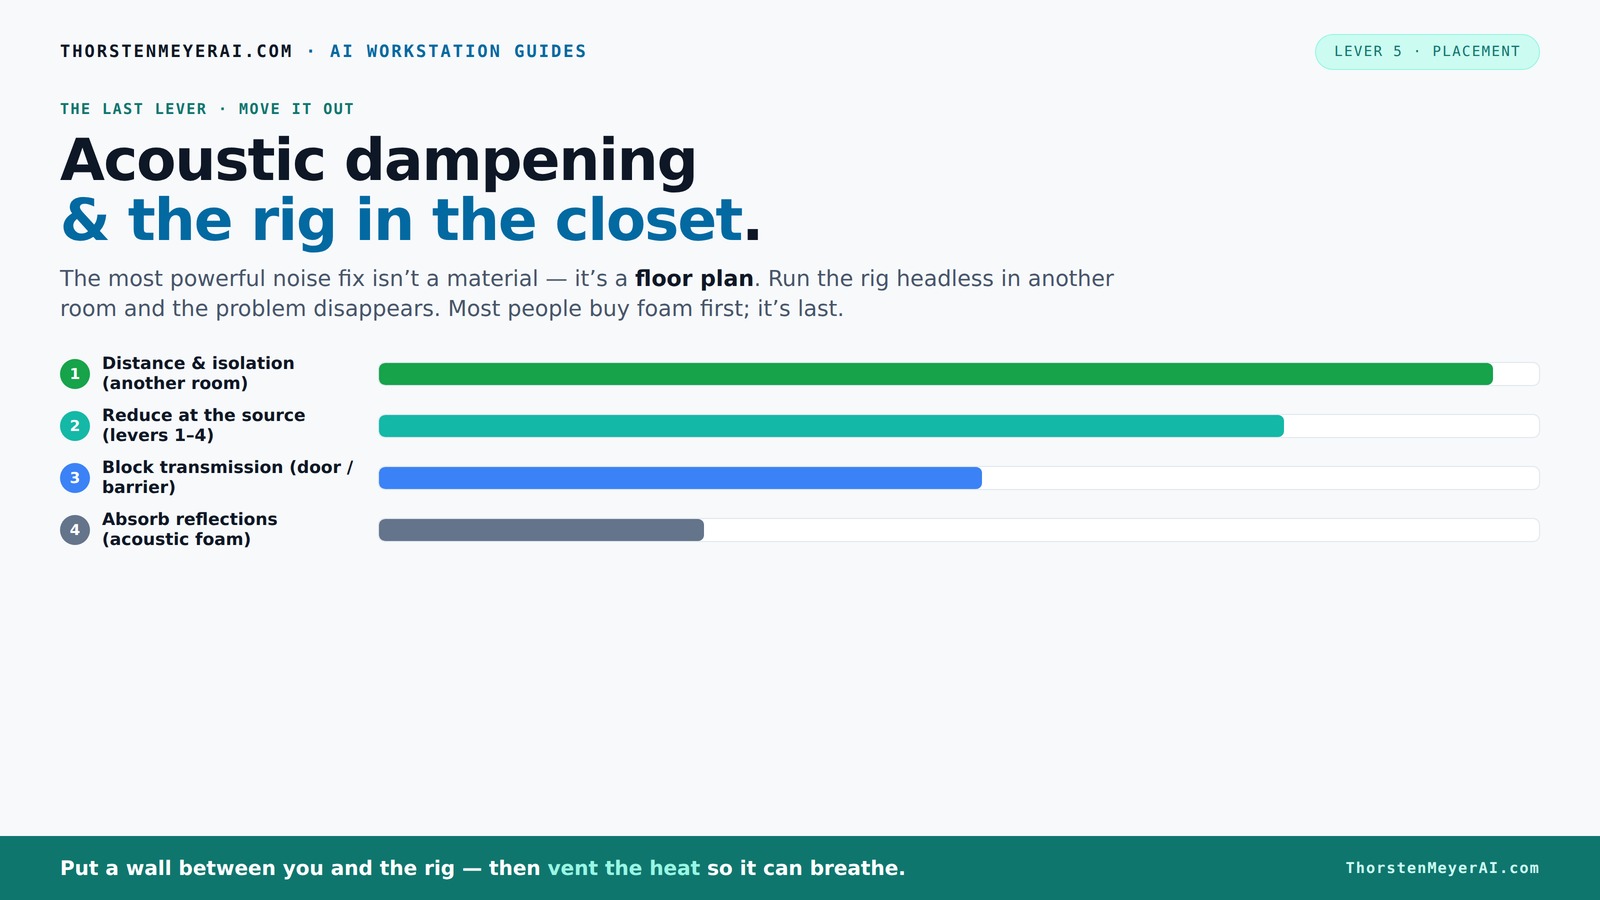
Acoustic dampening
& the rig in the closet.
The most powerful noise fix isn’t a material — it’s a floor plan. A rig you can’t hear because it’s in another room beats any amount of foam. Tap the approaches in Part 1 to see what actually works.
(another room)
(levers 1–4)
(door / barrier)
(acoustic foam)
Contain the noise, not the heat
Key Takeaways
- Sealing gaps around the door and walls is just as important as adding foam for soundproofing.
- Placement of acoustic panels at reflection points dramatically improves voice clarity in small spaces.
- Ventilation is critical to keep high-power rigs cool and quiet — don’t ignore it.
- Thicker absorbers and bass traps help control low-frequency resonance common in tiny closets.
- The best closet booth is built around smart mic positioning and reflection management, not just more foam.

Focusound 52 Pack Acoustic Foam Panels 1" x 12" x 12" Sound Proof Foam Panles Soundproofing Noise Cancelling Wedge Panels for Home Office Recoding Studio with 300PCS Double-Side Adhesive
- Soundproofing Design: Triangular grooves for noise absorption
- Includes Adhesive Tape: 300pcs double-sided adhesive for easy installation
- Easy Shape Recovery: Reverts to shape after soaking in water
As an affiliate, we earn on qualifying purchases.
As an affiliate, we earn on qualifying purchases.
Why Acoustic Dampening Isn’t the Whole Story — And What Really Matters
Acoustic dampening tools like foam, blankets, and rugs are great at softening echoes inside your closet. But they don’t block sound from escaping or leaking in. Think of them as softening the room’s voice, not cutting off the noise.
To truly quiet your setup, you need to focus on sealing gaps around doors and outlets, and positioning your mic to avoid reflections. The right mix of absorption and sealing makes your voice clearer and more natural.
For example, a DIY closet booth using thick blankets over the door and foam panels behind the mic can cut echo and leakage, but sealing gaps around the door and vents is what keeps noise from escaping. Without proper sealing, sound leaks undermine your efforts, making your recordings less isolated and more prone to background noise. This means your recordings can pick up unwanted external sounds or leak your voice into other parts of your home. The tradeoff is that excessive sealing can make access difficult or trap heat, so balance is key. Properly sealing a closet ensures that what you record is primarily your voice, not the ambient noise, leading to cleaner, more professional-sounding results.
Where to Place Acoustic Panels for Maximum Voice Clarity
Placement of acoustic treatment is more critical than the amount of foam you buy. Start with the wall behind your mic — that’s where most reflections bounce back into your recording. Add panels at reflection points on side walls and the ceiling.
In a small closet, walls and the ceiling are close enough that reflections create a boxy, muffled sound. Covering these surfaces reduces slap echo and enhances clarity. Proper placement en can improve your sound quality significantly.sures that sound waves are absorbed where they tend to bounce, preventing them from creating muddiness or harshness in your recordings. You can learn more about acoustic treatment placement.
A practical tip: use a mirror to find reflection points — place panels where you see your own reflection in the mirror from your mic position. This method helps you target the most problematic areas without guesswork, saving time and money. Remember, over-absorbing can make the space too dead, dulling the natural tone of your voice, so aim for a balanced treatment that preserves some room ambiance. Deep reflection points can be identified by observing where sound reflections are strongest, and addressing these spots with panels prevents the buildup of echo, which can make recordings sound unnatural or overly reverberant. Proper placement ensures your voice remains warm and natural, avoiding the 'dead room' effect that can occur with excessive treatment.
Sealing Gaps and Doors — The Hidden Key to Quiet and Clarity
Gaps and cracks around the door and walls leak sound like a sieve. Sealing these leaks is the most overlooked step in creating a quiet closet booth. For detailed tips, see this guide on sealing and placement. Weatherstripping, door seals, or even overlapping blankets can block unwanted noise from entering or escaping.
Imagine sealing every crack in the door frame — suddenly, a noisy street outside becomes less noticeable, and your voice comes through cleaner. This prevents external noise from bleeding into your recordings and internal sound from leaking out, which is crucial if you’re in a noisy environment.
However, sealing isn’t without tradeoffs. It can make access to your equipment less convenient and trap heat, risking overheating. Using removable or adjustable seals allows you to balance sound isolation with accessibility and cooling needs. For instance, sealing gaps with removable weatherstripping enables quick adjustments when needed, maintaining a quieter environment without sacrificing comfort or safety. Proper sealing can significantly improve your recording clarity, but it's important to consider how often you'll need to access your gear or vent heat. Using flexible, removable seals provides a practical compromise, ensuring your space stays quiet while remaining functional and safe.
How to Deal with Low-End Resonance and Standing Waves
Small closets tend to amplify low frequencies, making your recordings sound boomy or muddy. Thick panels or bass traps are the best fix, but in a pinch, dense rugs or carefully placed pillows can help absorb some of that low-end energy. Learn more about low-end treatment strategies. The goal is to prevent low-frequency buildup, which can cause your voice to sound muffled or distorted, reducing clarity and natural tone.
For example, placing a thick rug or foam bass trap in the corner where your closet walls meet can reduce bass buildup, making the voice sound tighter and more natural. These low-end issues are often the result of standing waves—resonant frequencies that bounce back and forth between surfaces, creating peaks and valleys in your frequency response. Addressing these with bass traps or strategic placement of absorptive materials prevents such resonances, ensuring your recordings are clear and balanced across the spectrum.
Thicker absorbers (like 4-inch panels) are better at handling low frequencies than thin foam. This prevents your voice from sounding like it’s coming from inside a cardboard box, giving you a more professional and natural sound. Recognizing the importance of low-end treatment means understanding that without proper bass management, recordings can sound muffled, boomy, or unnatural. The tradeoff involves balancing absorption with the room’s natural sound; over-treating can dull the tone, while under-treating leaves resonances that muddy your recordings. Using bass traps strategically in corners and along walls helps to tame these resonances, resulting in a more balanced and natural sound profile.
Ventilation and Heat — Keeping Your Closet Rig Cool and Quiet
Putting a high-power rig in a closet sounds great until it overheats. Trapped heat can cause throttling and noisy fan noise. The solution? Ventilation. A simple passive vent or a quiet exhaust fan can keep air moving and prevent heat buildup. For more tips on cooling your setup, visit VR gear safety and maintenance.
For example, installing a small computer fan with a duct can pull hot air out, keeping the room cool and preventing the rig from throttling. Proper placement ensures that airflow is effective without introducing sound leaks that compromise your acoustic environment. Not addressing heat can lead to performance issues and equipment damage, so investing in good ventilation is essential for long-term reliability.
More advanced options include purpose-built soundproof cabinets with temperature-controlled exhaust systems, which balance noise reduction with cooling needs. These systems often incorporate silent fans and insulated ducts to prevent noise transmission while maintaining optimal temperatures. Understanding that proper ventilation prevents overheating and fan noise is crucial for maintaining a clean recording environment. Overheating can trigger noisy fans, which then contaminate your recordings, and can also reduce the lifespan of your equipment. Therefore, integrating quiet, effective ventilation solutions is a key part of a sustainable closet studio setup. For detailed strategies, check out this guide on [how to reduce heat and noise in your AI workstation](https://thorstenmeyerai.com/reduce-heat-noise-ai-workstation/).
Quick Tips for Building Your Perfect Closet Booth
- Start with mic placement — position it away from reflective surfaces.
- Add acoustic panels at reflection points — behind mic, side walls, ceiling.
- Seal gaps around the door using weatherstripping or blankets.
- Use thick rugs or bass traps for low-end control.
- Ensure proper ventilation to keep heat down and noise out.
In a recent project, these steps reduced echo, improved clarity, and kept the rig cool — all in a tiny closet.
Frequently Asked Questions
Is acoustic dampening the same as soundproofing?
No. Acoustic dampening reduces echoes and reflections inside a room, making recordings sound clearer. Soundproofing blocks sound from entering or leaving the space, which requires sealing gaps and adding mass. Both are important, but they serve different purposes.
Where should I place acoustic panels in a closet booth?
Start with the wall behind your mic — it’s the primary reflection point. Then, add panels on the side walls, ceiling, and possibly the door. Use a mirror trick to identify reflection points for the best placement.
Should I seal the closet door or use blankets?
Sealing gaps with weatherstripping or acoustic sealant is most effective for blocking sound leaks. Overlapping blankets or curtains over the door also work well for quick fixes, especially if you want to improve isolation without permanent modifications.
How thick should acoustic panels be in a small closet?
For a tiny closet, 2-inch panels usually suffice for mid and high frequencies. For better low-frequency control, opt for 4-inch panels or bass traps, which handle deeper sounds more effectively.
Can rugs or carpets really help in a closet booth?
Yes. Rugs absorb foot traffic noise and reflections from the floor, making your recordings sound warmer and less boomy. They’re a simple, effective addition to your acoustic treatment.
Conclusion
The smartest closet booths focus on placing sound where it belongs — away from reflective surfaces, sealed tight, and cooled properly. Foam alone won’t cut it; strategic placement and sealing make all the difference.
Remember, your closet can be a surprisingly good studio — if you treat it with intention. Now, go build your quiet, clear, cool space and record like a pro.